Follow the steps below to learn how to take screenshots from Mac or Windows computers.
In this section:
Taking a screenshot from your Windows computer
- Select the Start
 menu button, type "snipping tool" in the search box.
- Open the Snipping Tool app.
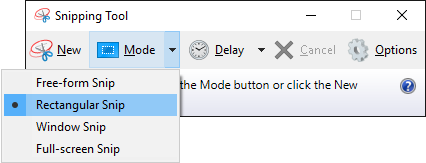
- Select New. You’ll see the whole screen change slightly to gray.
- Click and drag the crosshair to select the area of the screen to capture.
- After you capture your snip, select the Save Snip button or press Crtl+S.
- In the Save As box, type a file name, select a save location, and then choose Save.
Taking a screenshot from your Mac computer
- Press and hold the following three keys: Shift, Command, and 3.

- Wait for the screenshot to save to your desktop.
Note: By default, screenshots save to your desktop with the name “Screen Shot [date] at [time].png.”
Taking a snip screenshot from your Mac computer
- Press and hold the following three keys: Shift, Command, and 4.

- Click and drag the crosshair
 to select the area of the screen to capture. To move the selection, press and hold Space bar while dragging. To cancel taking the screenshot, press the Esc (Escape) key.
Note: By default, screenshots save to your desktop with the name “Screen Shot [date] at [time].png.”